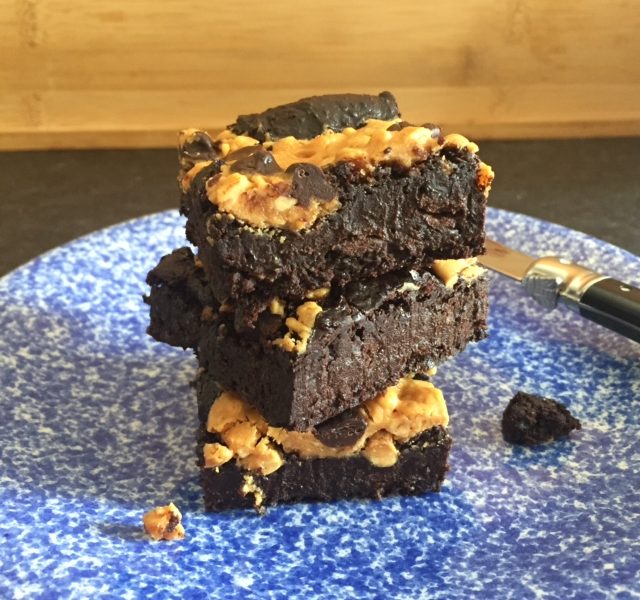
These are my favourite new creation - a “healthier” dark chocolate vegan brownie, that you make in a nutribullet (or magimix, or with a stick blender, or potato masher…)

I’m a massive fan of learning new tricks when baking, and this recipe definitely ticks that box…

img_6457

For me, the most important thing in baking is the TASTE. Baked goods have to be delicious, better even, than your favourite indulgent version - otherwise, what’s the point? For me, my favourite brownie ever is the Ottolenghi hazlenut brownies, which taste incredible.

Baked goods need to taste good, but, if they then have a secret, healthier or different ingredient combination, then this is what makes them truly “better”. These brownies are vegan, which is great for many reasons, gluten free, great for coeliacs or those with IBS, dairy free, great for lactose intolerant people like my friend Kate, and made with beans, great if you love beans.

img_6264

So here, with great pleasure, because these bean brownies are really lush indeed, is the recipe!

The only piece of kit that you need is a blender, or a chopper, a masher, or something, anything that will blitz your black beans into a smooth, speckledy paste…oh and a bowl, a spoon, some scales…agh you get it…Bee.xx

img_6444 img_6447

Bee’s vegan black bean nutribullet brownies

Ingredients:

400g tinned ready to cook black beans (or pre-soaked and cooked black beans, which take forever to prepare but are much cheaper)

2 tbsp ground flax seeds, mixed with 6 tbsp hot water to a thick gooey paste

70g brown sugar (or coconut sugar)

80g cocoa powder (or about 70g raw cacao)

80g dark chocolate, chips or finely chopped (dairy free if needed, save some for the top!)

60g maple syrup / honey (obvs not vegan)

3 tbsp melted coconut / olive / vegetable oil

1 tsp good quality vanilla extract

1 tsp baking powder

1 large pinch of sea salt (optional, for the top)

2-3 tbsp warm peanut butter (optional, for beautiful drizzling)

Recipe:

Throw the beans, oil, flax mush and vanilla extract into your blender / nutribullet (I used the 900W version with the giant cup thing) / magi mix and blitz until you have a smooth speckled paste. You can do this by hand, but you’d need to very finely chop the beans up to ensure there are no bean skins in your teeth after eating - which takes forever.

Add the rest of the ingredients (barring the choc chips) into the mix, and blitz again until well combined. If the mixture is too thick to mix, add a splash of non-dairy milk and blitz again.

Pour / scrape / dollop your mix into a lined brownie pan, I used a 20cm x 30cm pan, and spread evenly. Pour on your peanut butter and sprinkle the salt and a few choc chips on top. Bake at 160 degrees celcius for around 30 - 40 mins, when a knife tip will still come out gooey, but that’s what you want, right?

Allow to cool, and enjoy.

This awesome recipe is from my first cookery book - Bee’s Brilliant biscuits, and is such a delicious recipe, I’m so happy to share it!

Image credit: Sisley White

Image credit: Sisley White

The dough (or goo, a more accurate description) uses mushed up avocado as the base, so its creamy, smooth, with a lovely gooey consistency, but without using animal products. The mixture can be made with gluten free flour, and is dairy free too, if you use vegan / very dark chocolate in it (some dark chocolates still contain milk solids).

The recipe is easy peasy to scale up or down, about 4 x the recipe will give you enough mixture to create this super cool 5 inch round cookie cake - I filled this one with ombre vegan buttercream.

IMG_4457 IMG_1183

If you happen to make too much mixture (!), then I suggest you freeze gold ball sized bits of it, and when needed / wanted, bake straight from frozen for about 15 minutes.

Let me know how you get on with the baking - remember that you need really ripe and well mashed avocados - no lumpy bits please! Tag me on instagram / twitter @beesbakery and tag it #BeesBrilliantBiscuits and I’ll regram the pics!

Bee xx


Bee’s Dark chocolate and avocado cookies

Ingredients (Makes six large cookies)

  • 1 large ripe avocado (when it’s skinned and de-seeded you’ll need around 110g)
  • 1 egg
  • 150 g light brown soft sugar
  • 40 g cocoa powder / 35g cacao powder
  • 40 g melted chocolate (dark or milk, if you want a dairy free cookie check the ingredients and choose a choc with no milk solids)
  • A pinch of salt
  • 50 g gluten free self raising flour (any combination of the following flours will work – rice flour, gram flour, ground almonds, soya flour, coconut flour - its good to mix up a few different types in each batch )
  • 1 tsp vanilla bean paste
  • ½ tsp xanthan gum (optional –without this, your cookie will be crumblier)
  • 1 tsp baking soda
  • 80 g roughly chopped dark chocolate (again look for no milk solids if you want a dairy free cookie)

Method

Pre-heat your oven to 170°C and line a baking tray / sheet with parchment paper.

Scoop your avocado into a large bowl and thoroughly mash until a smooth green goo is formed – no lumps please! Puree it if you have a food mixer / blender.

Add the rest of the ingredients into the bowl and beat with a wooden spoon using good old muscle power, until a nice shiny consistent wet mix is formed. It’ll look like a very sticky and dark coloured cake mix rather than a firm cookie dough. If you taste a little of the mixture at this point, you’ll be amazed at how “green” it tastes, but after baking, all of the vegetable taste is gone – thank goodness!

Add most of your chocolate chunks, saving some of the larger pieces to press into the top of each cookie before baking.

Using two metal spoons or an ice cream scoop, dollop roughly even sized round shaped cookies onto your baking tray – larger is always better with these ones, and they don’t spread much when baking. If you prefer a thicker fudgier cookie, pile the mix high and be prepared to bake for the full time. If you like a thinner chewier cookie then spread it out more and bake for less time. Press a couple of chocolate chunks into the top before baking.

Bake for 12-15 minutes – the cookies will still be slightly soft to the touch when done, but do firm up and go nice and gooey after cooling.

Freeze any leftover mixture for up to one month, and eat your baked cookies within 3 days otherwise they’ll go a wee bit chewy / yuck.

Tag me on instagram / twitter @beesbakery and tag it #BeesBrilliantBiscuits and I’ll regram the pics!

Bee.xx